Mask2Label · instance masks to single-row polygon labels
One polygon row per instance. Holes and detached parts intact.
Mask2Label converts the masks your annotators, SAM or your renderer already produce into label rows in the YOLO segmentation format, without filling holes, dropping fragments or splitting one object into several. There is no limit on the number of holes or separate parts in an instance.
A Python + Cython converter with source, tests and documentation. Offered as a commercial licence, an exclusive licence or an outright IP purchase, with fixed-fee integration into your export pipeline. Output checked against the Ultralytics 8.4.12 dataset loader.
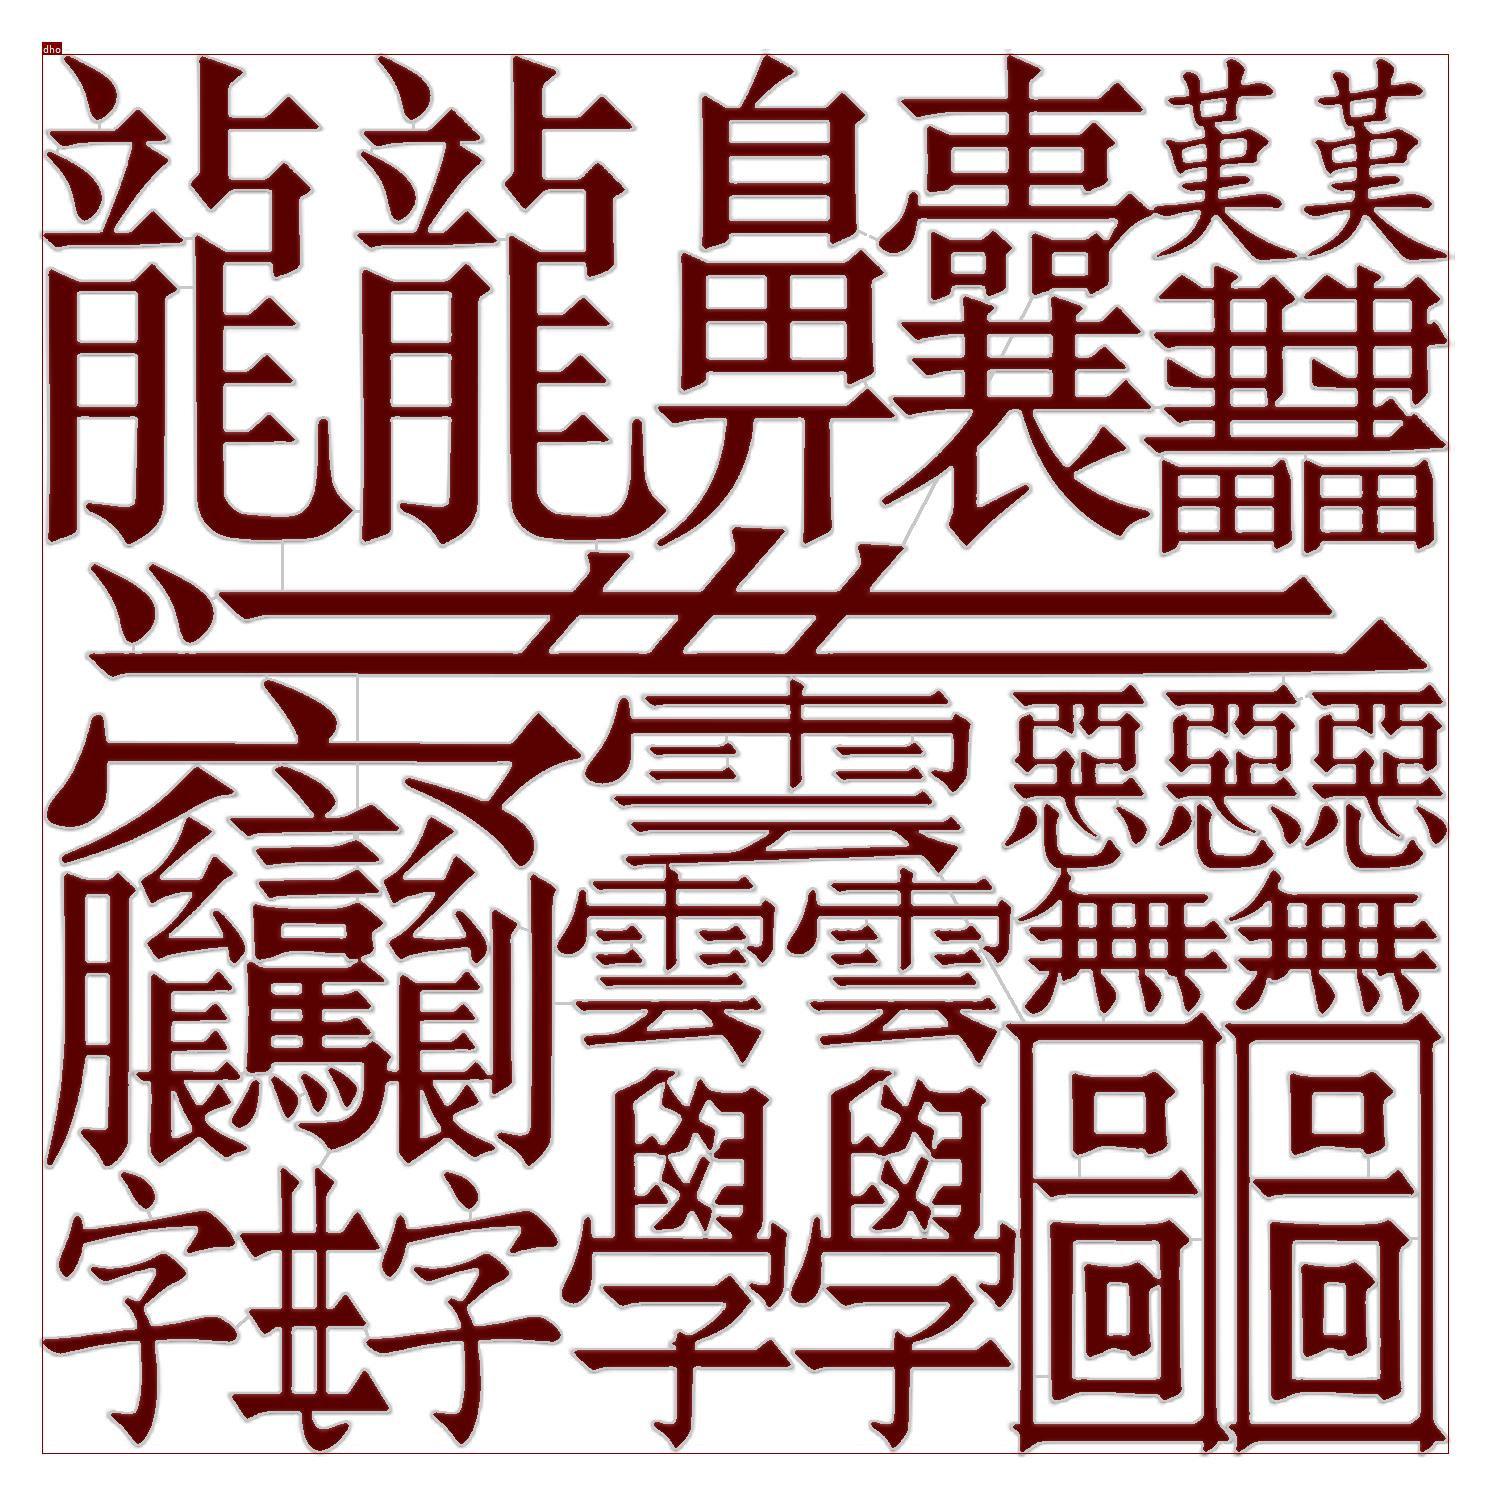
1 rowfor an instance with 91 separate parts and 81 holes
0 pxof foreground lost on twelve test masks in Ultralytics’ own rasterizer
99.7%IoU on the dense-glyph mask; the free exporters score 93.8% and 73.9%
1,970handwritten-letter masks converted in a single batch run
Where mask-to-polygon conversion goes wrong
The YOLO segmentation format stores one flat list of points per object. It has no syntax for a hole or for an object in several pieces, so every converter has to make a choice, and the usual choices change your labels without telling you.
Holes get filled
Tracing only the outer boundary turns a ring into a disc. The model is then trained to predict pixels your annotator deliberately left out.
Parts get dropped or split
An occluded or fragmented object becomes “largest piece only”, or several separate objects. Instance counts no longer match the source.
Raster masks have no route at all
Brush tools, SAM output, medical masks and rendered segmentation images are rasters. Many exporters write YOLO-format labels only from hand-drawn polygons.
Real examples
These are real source images with the converter’s real output drawn on them. Switch between the archive render, a contour-only view and a filled view; boxes and class labels are shown in each. Click any image to open it at full size.
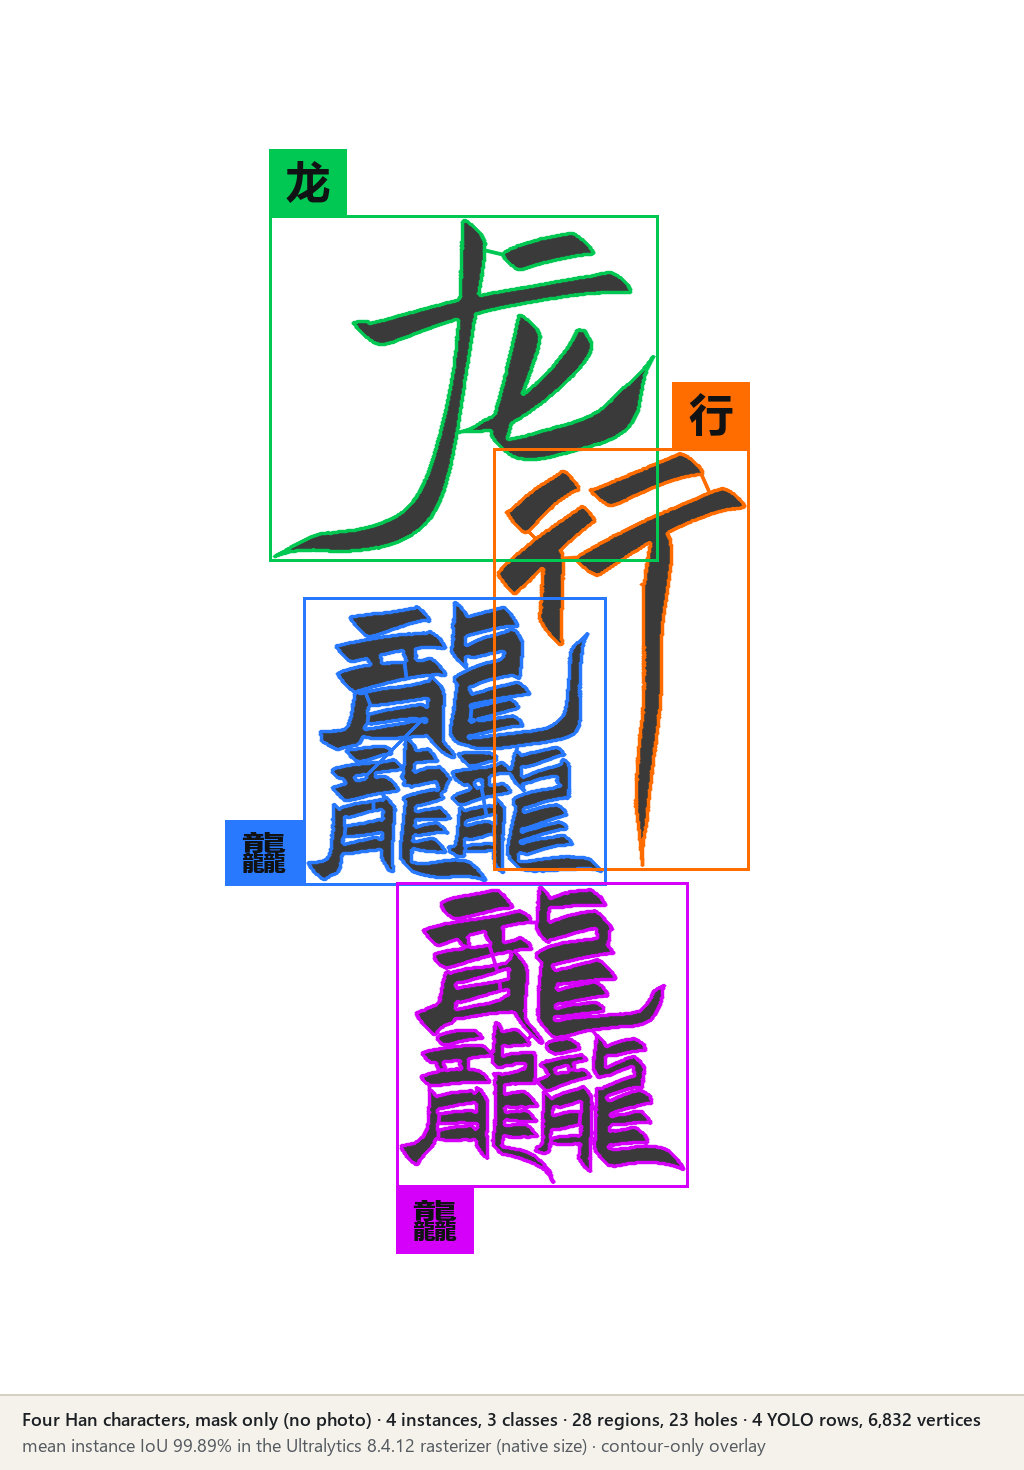
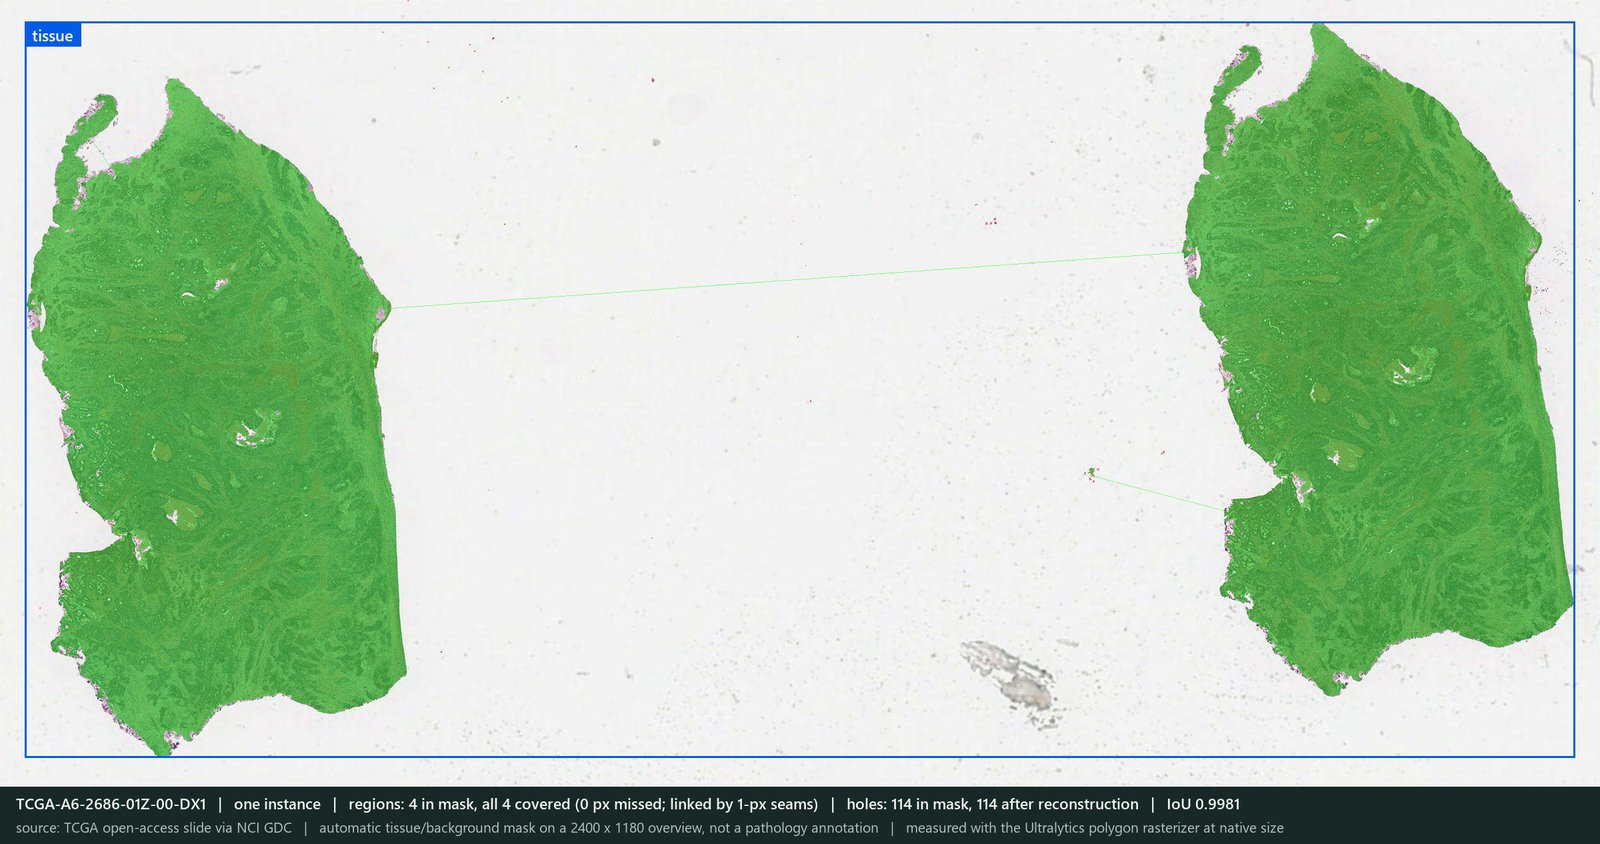
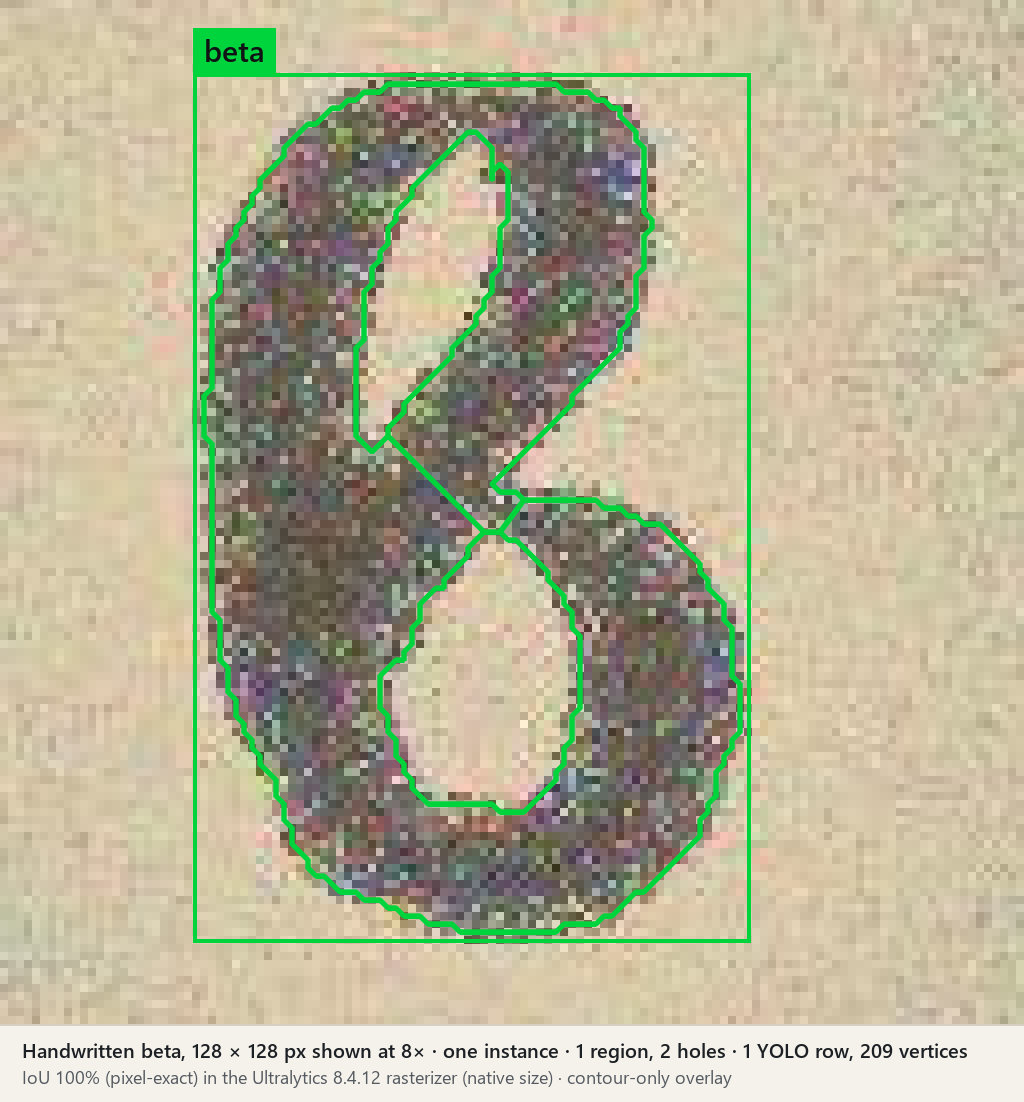
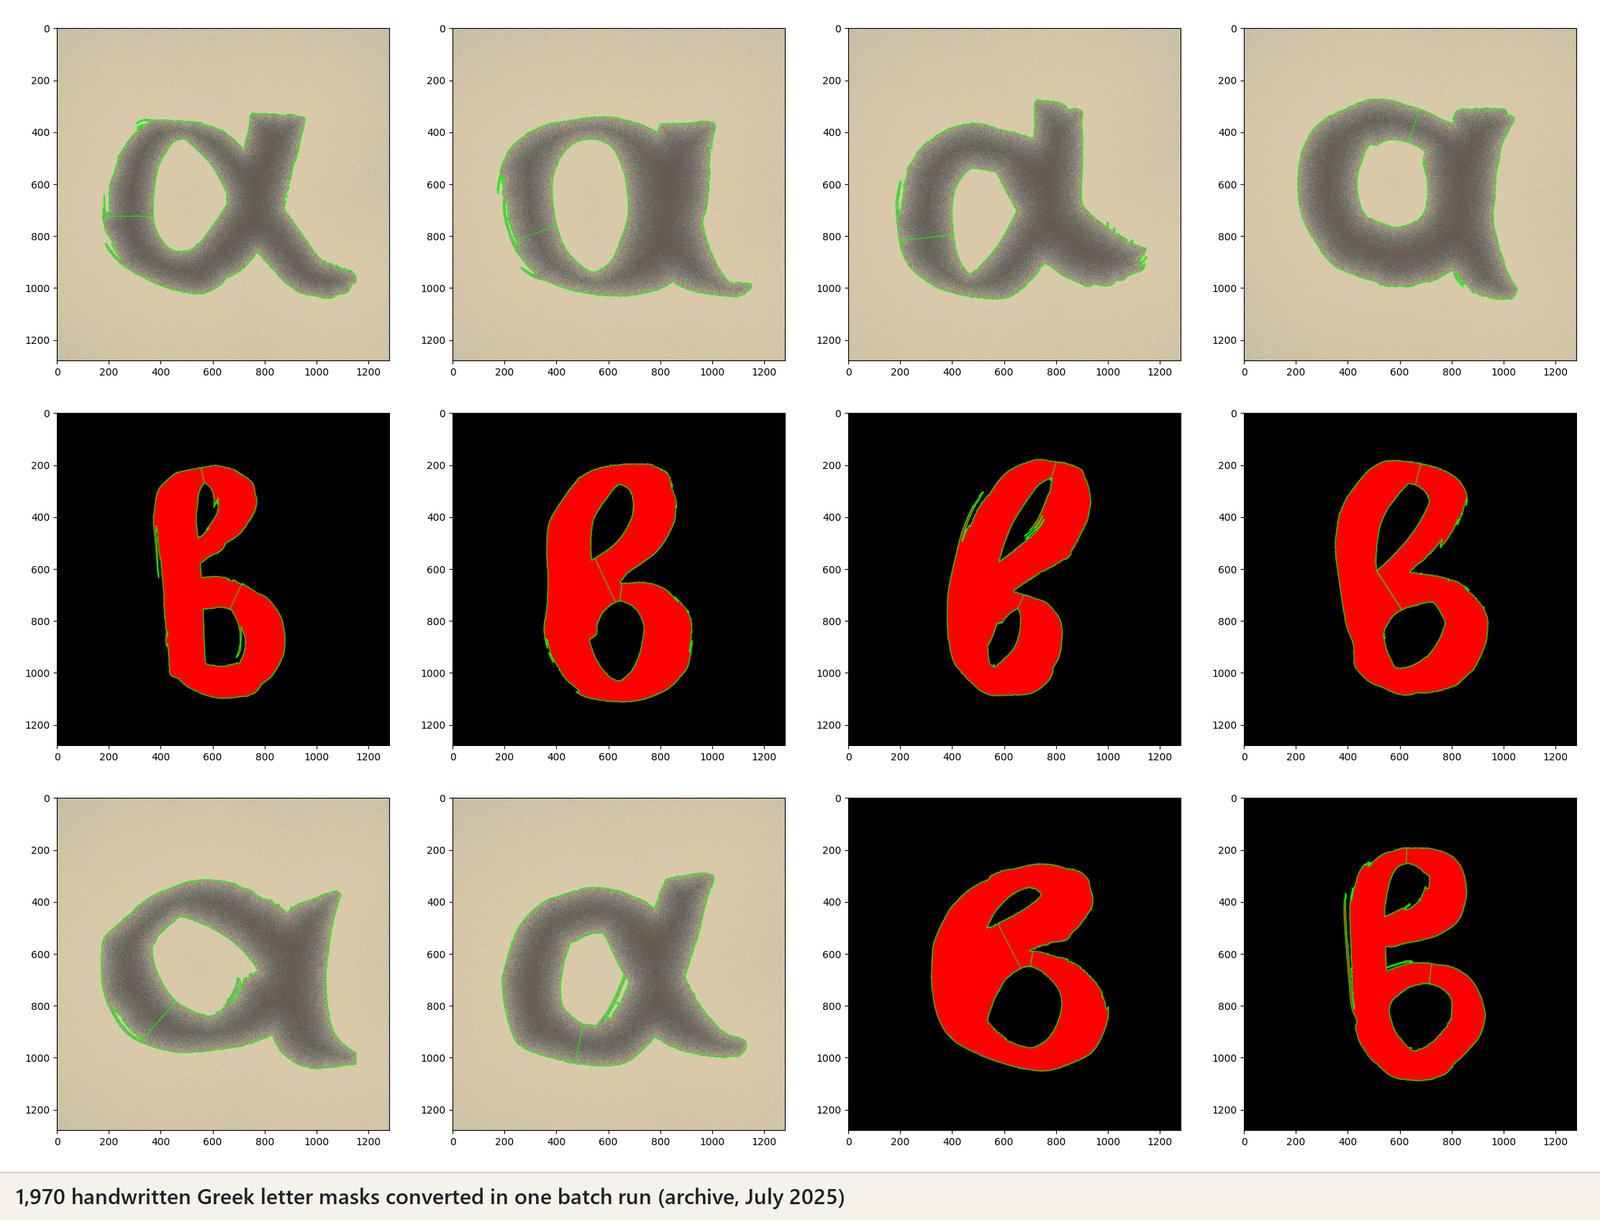
How to read the overlays: the straight lines that cross gaps are zero-width seams. They are how a single YOLO row can carry many parts and holes; a seam is traced out and back, so it encloses no area. Label files are not published here; they are delivered with an evaluation build or a licence.
Measured against the free alternatives
Two free tools now write holes and multi-part masks into YOLO rows, so the fair question is what the Ultralytics loader gets back from each. Every label below was rasterized with Ultralytics’ own polygon2mask and compared with the source mask, pixel for pixel.
| Test mask | Mask2Label | supervision 0.31.7 | Ultralytics convert_coco* |
|---|---|---|---|
| Dense glyphs: 1 instance, 91 parts, 81 holes (1500 × 1500) | 99.70% | 93.80% | 73.87% |
| Four overlapping characters: 4 instances, 23 holes | 99.89% | 93.29% | 91.69% |
| Handwritten β: 1 instance, 2 holes (128 × 128) | 100.00% | 95.50% | 81.19% |
| Multipart test shape: 19 parts, 7 holes (89 × 83) | 98.78% | 67.70% | 68.20% |
| 200 holes of 1–3 pixels in one blob (synthetic) | 100.00% 200 of 200 open | 99.51% 103 of 200 open | 99.60% 0 of 200 open |
| Foreground pixels lost, all twelve test masks | 0 | 0 to 20,042 per mask | 0 to 10,829 per mask |
| Seconds for the dense-glyph mask | 4.3 | 0.1 | 0.1 |
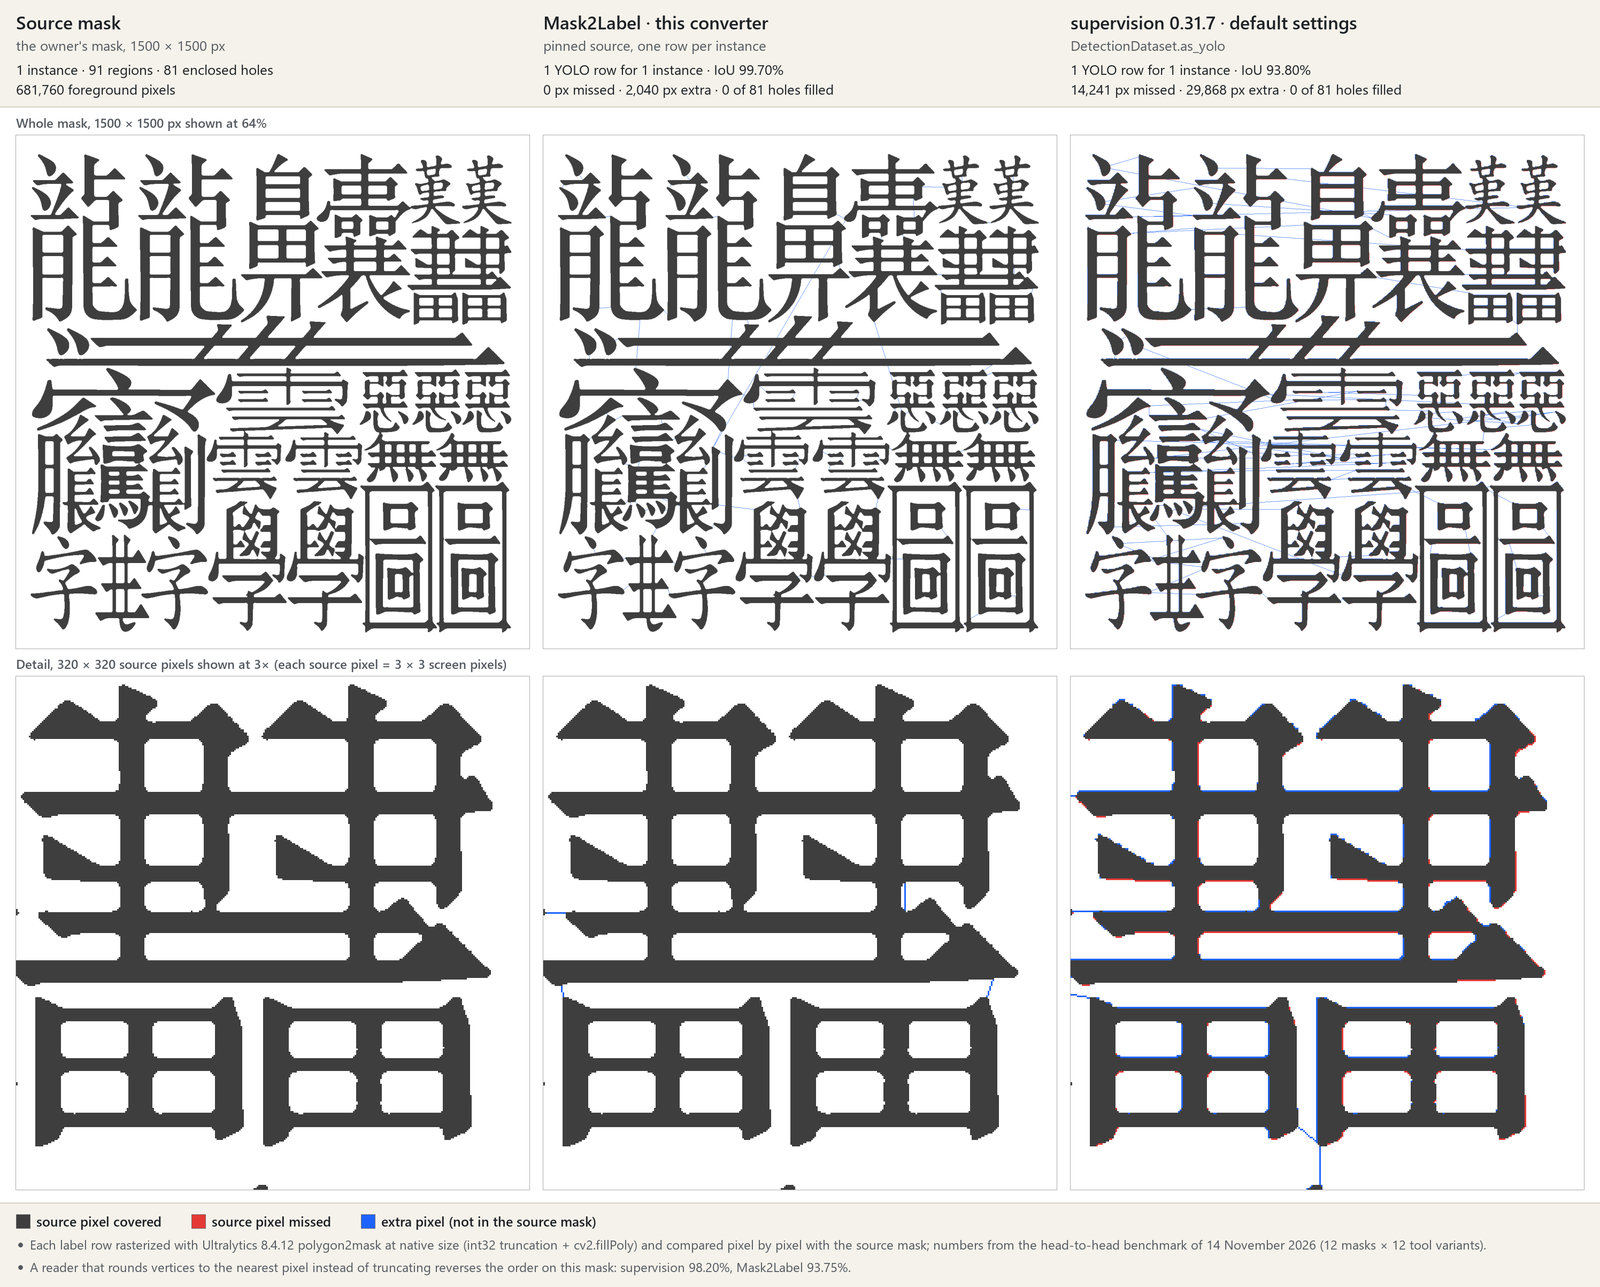
Read this before you trust it. Versions: Ultralytics 8.4.12, supervision 0.31.7 (DetectionDataset.as_yolo, default arguments), OpenCV 4.12, Python 3.13; twelve masks, six real and six synthetic. *convert_coco was given each instance’s outer contours, which is what its own mask path keeps; given the hole contours as extra polygons it scores 92.6% on the dense glyphs. The Ultralytics rasterizer truncates polygon vertices to whole pixels, and that is the convention these labels are written for. A rasterizer that rounds to the nearest pixel reverses the ranking (dense glyphs: 93.8% for Mask2Label, 98.2% for supervision). Through the full Ultralytics training loader at 640 pixels with the default mask ratio, the same two labels score 89.2% and 84.8%. Mask2Label is the slowest of the three; a faster seam search is part of the integration work. These are twelve masks, not a study, and they say nothing yet about trained-model accuracy. Run it on yours.
Try it on your own masks, free
You should not have to take a stranger’s screenshots on trust. Send a handful of masks that give your current export trouble and compare the result with what you ship today.
- Send 5–10 masksAny raster form: PNG instance or class maps, brush or RLE exports, SAM output, rendered segmentation with an ID map. Public or synthetic samples are fine.
- 48-hour turnaroundI run the converter and measure the result the way the Ultralytics training loader rasterizes it.
- You get the evidenceOverlays for every mask, a per-instance report (rows, holes, parts, pixel differences) and a pixel-level diff against the export you use today. The label files themselves follow with an evaluation build or a licence.
- Then decideIf it solves a problem you have, pick a commercial structure below, or propose your own. If not, nothing is owed and your files are deleted.
Three ways to buy it
Every team is offered the same three structures. Integration into your export or import path is quoted separately as a fixed fee, so you know the total before you commit.
Integration, fixed fee. An adapter for your mask encoding and class map, output in your dataset layout, acceptance tests against the loader you target, documentation and a hand-over. If your SDK is open source, the adapter can be delivered under your licence. Typically $6,000–$12,000 for one format. An optional 30-day evaluation build is $4,500, credited in full against any licence or purchase.
Have a different structure in mind? A smaller scope, a longer term, a paid pilot first, a revenue share, a contracting arrangement — propose it. Counter-offers on rights, scope, timing and budget are welcome and will get a straight answer.
How the process works. Several teams are looking at this at the same time. Non-exclusive licences stay available to everyone. Exclusivity or ownership goes to the first team that commits to it, or to the best offer received by Friday 11 December 2026.
What is delivered
The same package under any of the three structures; only the rights differ.
- Converter sourcePython with a compiled Cython core; command line and batch folder mode.
- Input handlingColour-encoded instance PNGs (class and instance IDs in the pixel values), with adapters scoped to your own encoding.
- OutputsLabel rows in the YOLO segmentation format, in the dataset layout the Ultralytics documentation describes, plus SVG and JSON for inspection.
- Stress corpus and testsThe hard cases shown on this page and a synthetic torture set, with expected results.
- Fidelity reportPer-instance rows, holes, parts and pixel differences, measured the way your training loader rasterizes labels.
- Hand-overDocumentation, a walkthrough call for your engineers, and a bug-fix window.
Questions engineers ask first
Doesn’t Roboflow’s supervision library already do this?
Since October 2026 it bridges holes and merges multi-part masks into one row, and for many datasets that is all you need. If it already works on your masks, use it. Where the two differ is in what the Ultralytics loader gets back: on my twelve test masks, supervision 0.31.7’s default export missed 14,241 foreground pixels on the dense-glyph mask and closed 97 of 200 one-to-three-pixel holes on a synthetic one, while Mask2Label missed none on any of the twelve. Supervision is much faster, and under a rasterizer that rounds instead of truncating it is the more exact of the two.
That is what the free sample is for: both tools on your masks, measured with the same rasterizer, side by side.
Can a YOLO-format label really hold a hole?
Not natively. The format is one flat polygon per row. A hole is carried by a zero-width seam: the outline runs in to the hole, around it, and back out along the same path. Ultralytics’ own maintainers describe bridging as the available workaround, and their loader draws a seam as a one-pixel line where it crosses background. Mask2Label reports, for every instance, exactly how many pixels that adds.
Which inputs does it take?
Today: PNG instance masks with class and instance IDs encoded in the pixel values. Brush or RLE exports, 16-bit instance-ID bitmaps, SAM masks and renderer output with an ID map are adapter work, scoped and priced per buyer.
Our SDK is open source. Can the code live there?
Yes. The adapter can be written for your repository and delivered under your licence, or you can buy the converter outright and release it however you wish.
Can we see the source before buying?
Yes, in stages. First the sample results on your own masks. Then, under a short evaluation agreement, a time-limited build your engineers can run themselves. The full source is delivered with a licence or a purchase.
Who owns it, and what comes with the paperwork?
I wrote it and I own it. A licence or assignment comes with a written warranty of authorship, the list of third-party dependencies and their licences, and whatever else your counsel needs to be comfortable.
How long does integration take?
Typically one to two weeks for one input format and one target layout, against acceptance tests agreed before work starts.
Who is behind this
I’m Athanasios Delis, a computer-vision researcher and engineer. I wrote Mask2Label and I am its sole developer and owner.
The converter came out of research on instance segmentation of handwritten characters, where almost every glyph has holes or detached strokes and the standard converters quietly damaged the labels.
Based in Athens, Greece (UTC+2), at D3 Innovation Engineering. Replies within one working day.
Request a free sample
Reply with five masks, or tell me which export gives you trouble. You can also send an offer or a counter-proposal directly.
athanasiosdelis@d3inneng.com